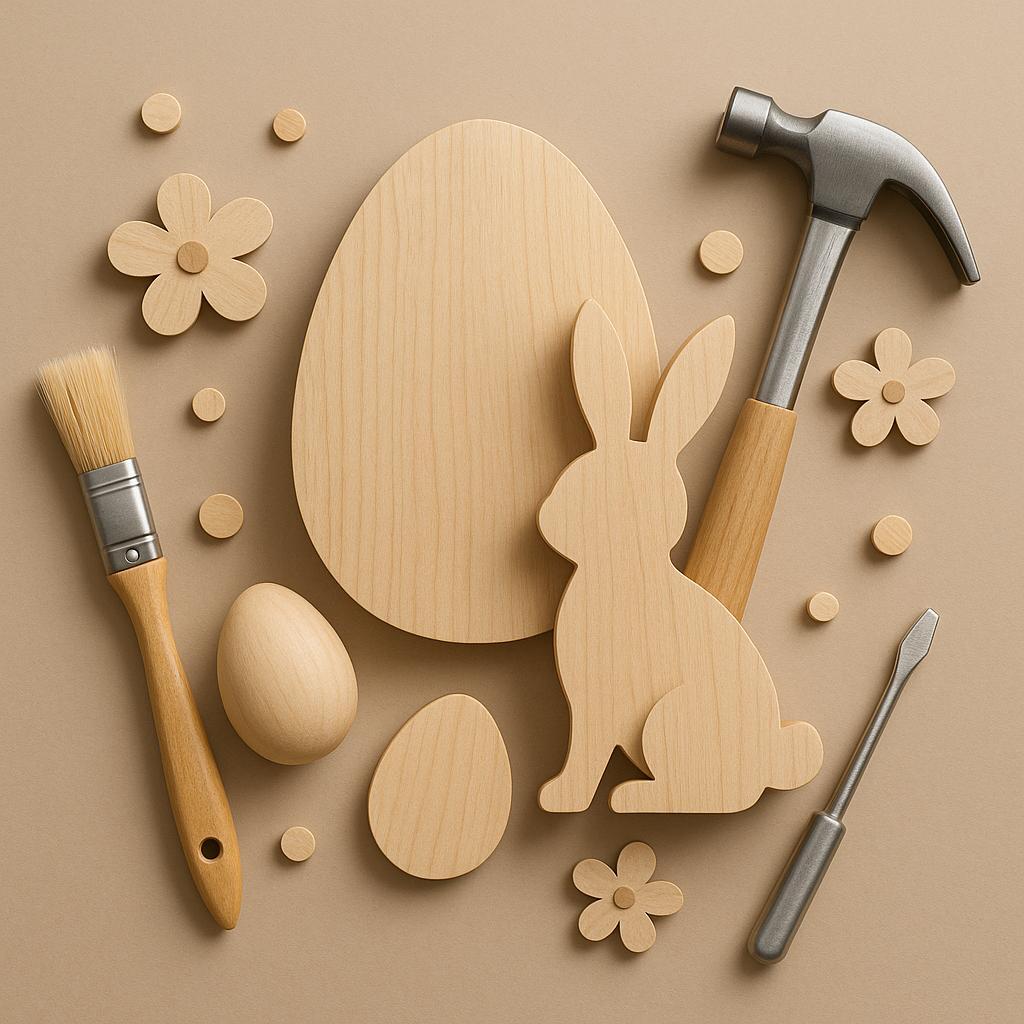
In DIY Wooden Easter crafts: Fun Family Project Ideas, what if your next project could hatch a handful of Easter smiles from a single scrap of wood? DIY Wooden Easter Crafts invites you to turn plain boards into playful springs-one spark of creativity and smiles at a time. For woodworking enthusiasts, these seasonal projects matter because they blend design, skill-building, and finished care into tangible keepsakes-and they seed family project ideas. They flex your planning, measuring, and finishing muscles while keeping safety and collaboration at the center. In this article,you'll discover a set of easy-to-follow ideas,tools and techniques,finish options,and tips to tailor each project for different ages and skill levels-so your workshop blooms this holiday.
:
Choosing the Right Wood and Safe Tools for Easter Craft Projects
Choosing the right wood for Easter crafts sets the tone for the project and the kids' safety. Look for pieces that are dry, smooth, and free of large knots or splits. Softwoods like Pine, Poplar, and Birch are beginner-pleasant because they cut and sand easily, reducing frustration during family time. Avoid pressure-treated boards or any wood with chemical residues, and skip painted or stained surfaces that could be harmful to curious little hands. Before you start, verify the wood's moisture content is low (ideally under 12%) to minimize warping as pieces dry after painting or sealing.
To guide your choices,here's a fast at-a-glance guide to common woods used in small Easter crafts. This snapshot helps you pick a material that's easy to work with and forgiving for little hands.
| Wood Type | Why It Works | Tips |
|---|---|---|
| Pine | Affordable, cuts cleanly | Watch for sap; sand smooth |
| Poplar | easy to sand; neutral grain | Dry and acclimate; avoid heavy knots |
| Basswood | Excellent for carving and painting | Widely available; consider pre-sanded sheets |
| Birch | Nice grain; good for panels | Pre-drill holes to prevent splitting |
With wood chosen, assemble a safe, kid-friendly toolkit that keeps little hands confident and safe. A solid set of hand tools and protective gear makes the biggest difference. For a starter kit, aim for a sharp utility knife, a small saw, a sanding block with a couple of grits, clamps, a ruler, and safety glasses plus a dust mask.If you choose power tools at all, use them only under adult supervision and prefer low-speed options with guards. Always test pieces on scrap wood first, pre-sand edges to remove sharp corners, and supervise every cutting or drilling step to minimize slips and splinters.
Get instant Access to 16,000+ Woodworking Plans →
Step by Step Family Friendly Projects for Creative Easter Moments
Crafting time becomes a treasure hunt when families build wooden Easter crafts together. These step-by-step ideas nurture creativity, teamwork, and a sense of achievement, while producing charming keepsakes for spring. Start with a trio of accessible projects that suit different ages: Wooden Easter Bunny Peg Door Hanger, Chick Egg Stackers, and Mini Basket Ornaments. Gather safe tools, craft paints, brushes, sandpaper, wood glue, and a sealant to set the finish, and set aside a relaxed afternoon for hands-on learning.
Begin with the Wooden Easter Bunny Peg Door Hanger by choosing a simple bunny silhouette from a single board. Step 1: Trace the shape and cut it with a safe saw under adult supervision. Step 2: Sand all edges smooth.Step 3: Paint a base color and add facial features with fine brushes. Step 4: Attach a peg or hang-hold on the back and seal when dry. This project reinforces design choices and fine-motor skills while offering a playful home accent.
Next,try the Chick Egg Stackers and the Mini Basket Ornaments,which spark different hands-on strengths. For the chick stackers: Step 1: Cut circular discs of varying diameters and a small beak from contrasting wood; Step 2: sand, paint yellow for the chick body and orange for the beak; Step 3: Drill a light center hole and fit a small dowel to stack the pieces securely; Step 4: Seal the finished pieces. For the mini baskets: Step 1: Create a shallow box with four sides and a curved handle; Step 2: Sand and paint; Step 3: Add a ribbon or twine for hanging and a tiny clasp to secure the lid; Step 4: Apply a protective finish. These projects offer a mix of precision, creativity, and small-muscled tasks suitable for varying ages.
| Project | Estimated Time | Skill Level |
|---|---|---|
| Wooden Easter Bunny peg Door Hanger | 60-90 min | Beginner |
| Chick Egg stackers | 45-60 min | Beginner |
| Mini Basket Ornaments | 30-45 min | Easy |
Get Instant Access to 16,000+ Woodworking Plans →
Personalization Techniques to Create Unique Wooden Easter Decor
Personalization begins with a story you want the piece to tell.Start by choosing a theme that fits your Easter celebration or the recipient's interests-pastel eggs, spring birds, woodland creatures, or a family crest. Let the wood grain guide the design; a simple silhouette or initials carved or burned into a smooth surface can feel elegant and personal. Before you commit,sketch a quick layout on paper and test a few font sizes on scrap wood to gauge readability from a distance.
Turn personalization into tangible techniques with a few practical options. You can opt for laser engraving or wood burning for clean monograms, dates, or tiny Easter motifs, or paint with brushes using stencils and freehand lettering for handmade charm.If you prefer a collage effect, try decoupage with decorative paper or inlay accents from contrasting wood scraps for subtle color. Remember to prep the surface by sanding smooth, filling knots if necessary, and sealing with a light sanding between coats to keep edges crisp.
Play with color and texture to make each piece distinctly yours.A light wash on the raised grain can reveal the wood's character while keeping the design readable; a stenciled egg shape filled with a couple of complementary tones offers cheerful contrast.For a rustic touch, leave some natural variations visible and add a personal emblem-like a family initial or a year-stamped or burned near the base. Consider incorporating a removable stand or a hanging ribbon so the piece can evolve with the season.
Quick-start workflow: choose a small wooden panel or block,settle on one personalization method,draft a simple design,transfer it onto the surface,execute the technique,and finish with a protective coat.Keep tools sharp, work in a well-ventilated area, and wipe away dust between steps for clean lines. With these intentional touches, your wooden Easter decor becomes a memorable keepsake for years of spring celebrations.
Get Instant Access to 16,000+ Woodworking Plans →
Finishing and Detailing for Durable and Safe Wooden Easter Crafts
Begin by preparing the wood with a clean, smooth surface.Sand in progressive steps from 120 to 220-320 grit to reduce splinters and soften sharp edges. Wipe away dust with a tack cloth and inspect for fuzz; a light final pass along the grain keeps the surface lively. Rounded edges are friendlier for little hands, so take a moment to bevel any corners and test-fit pieces before finishing.
Choose finishes that balance durability with safety. For most Easter crafts, a low-VOC water-based polyurethane or acrylic varnish offers a clear, durable shell with minimal odor. If you prefer a natural look, you can use an oil and wax finish (apply mineral oil and buff with beeswax) that's easy to reapply. remember to follow the label: avoid solvent-heavy finishes around kids, and ensure the coating is fully cured before handling or displays are used around food or little mouths.
Apply finishes in thin coats,letting each coat dry entirely and lightly sanding between coats with a 320- or 400-grit pad to keep the surface super smooth. After the final coat cures, buff with a soft cloth for a satin luster, or apply a light wax for a gentle sheen. For pieces that will be handled often or placed on tables, add a felt foot or gentle seal to protect surfaces and reduce wear. If you'll decorate with paints or decals, prime first, seal the design with a compatible topcoat, and test for compatibility to avoid cracking or peeling.
| finish Type | Pros | Cons | Ideal Use |
|---|---|---|---|
| Water-based polyurethane | Clear,quick-drying,low odor | Can raise grain if applied thickly | Most decorative pieces and toys |
| Oil-based polyurethane | Very durable,hard layer | Stronger odor,longer cure time | High-use surfaces or outdoor parts |
| Beeswax/oil finish | Natural look,easy to reapply,food-safe when cured | Less water resistance,needs reapplication | Keepsake items and natural-wood pieces |
| shellac | Fast-drying,easy to repair | Not water resistant,alcohol dissolves | Decorative accents and light-duty pieces |
Get Instant Access to 16,000+ Woodworking Plans →
Eco Friendly Materials and Upcycling Ideas for a Green Celebration
Eco-friendly materials turn a simple Easter craft into a family-friendly, planet-positive project.Start with reclaimed wood from pallets, old furniture, or branch offcuts rescued from neighbors. By reusing wood, you cut down on waste and give pieces a second life.Before you cut, inspect for nails or sticky residues, dry the wood thoroughly, and plan to minimize waste.Finish with non-toxic sealants such as beeswax, coconut oil blends, or plant-based varnishes to keep surfaces safe for curious hands.
Here are 4 practical upcycling ideas to try this season: napkin rings from scrap wood, pallet egg holders, mini Easter crates for gift boxes, and bunny silhouettes from leftover boards for window or mantel decor. For each project, keep tools simple: sand rough edges, cut to size with a handsaw or jigsaw, and test paints or stains on a scrap first. This approach celebrates creativity while keeping materials out of the waste stream.
For color and texture, turn to natural dyes and finishes made from kitchen staples: onion skins for warm amber, tea or coffee for deeper browns, beet juice for soft pinks. apply with a soft cloth, wipe off excess, and let dry in a well-ventilated space. Pair colors with a clear, non-toxic top coat so decorations stay vibrant through easter and beyond.
| Material | Eco Benefit | Best Uses |
|---|---|---|
| Reclaimed wood | Reduces waste; preserves character | Napkin rings, signs, decorative items |
| Leftover pallet wood | Widely available; sturdy | Gift crates, picture frames, small toys |
| Natural dyes (on wood) | Low-tox, food-safe | Color accents on ornaments and eggs |
To wrap it up in a green way, reuse packaging and display pieces: wrap gifts in recycled kraft paper, tie with cotton or hemp twine, and include seed-paper tags or fabric gift bags. store finished crafts in breathable containers to extend their life, and, when the season ends, consider swapping or donating items with friends to keep the cycle going.
Get Instant Access to 16,000+ Woodworking Plans →
Troubleshooting Tips for Smooth Craft Sessions and Quick Fixes
Getting through a family crafting session smoothly starts with a calm, organized workspace. Clear a sturdy table, lay down a protective mat, and keep essential tools within reach-pencils for layout, clamps for quick holds, and a damp rag for wipe-downs. Before you begin, have a simple plan sketched out for your Easter project, with step-by-step actions so little helpers know what comes next. A quick materials checklist (sandpaper, wood glue, non-toxic paint, brushes, and finish) helps prevent last-minute scavenger hunts and keep the flow moving.
As you work, address common hiccups with quick, actionable fixes. If glue won't hold, wipe away excess, reset with a tight clamp, and let it cure fully. for paint that dries too quickly or peels, switch to thin coats, use a light primer on bare wood, and give each layer ample drying time. If the wood shows cracks or splits, apply a thin line of wood filler, sand flush once dry, and seal with a finish to prevent new fractures. For splintered edges, sand with a fine block and consider a light edge treatment with a touch of wax or sealant to keep pieces smooth for little fingers.
For quick diagnosis and fixes, keep a small reference on the workbench. The table below highlights typical issues, fast remedies, and rough time estimates to keep sessions on track.
| Issue | Quick Fix | Approx. Time |
|---|---|---|
| Ragged cut | Resaw lightly and sand to smooth edge | 2-5 min |
| Glue stringing | Wipe glue strands, re-clamp and clean squeeze-out | 5-10 min (plus cure) |
| paint runs | Lightly sand, apply thin subsequent coats | 5-15 min per coat |
| Edges cracking | Fill with wood filler, sand flush | 5-15 min |
finish with a kid-friendly cleanup routine: wipe spills, store tools in a tray, and label paints for the next session. Short, focused bursts of activity-15 to 30 minutes at a time-keep energy high and frustration low. by pausing to assess issues early and keeping a calm pace, your family Easter crafts stay enjoyable, creative, and mess-free.
get Instant Access to 16,000+ Woodworking Plans →
Q&A
What wood types are best for beginner wooden Easter crafts?
Start with softwoods like pine or poplar,or ready-made plywood shapes. They sand and shape more easily and are affordable. Avoid knotty boards or hardwoods that split. Use water-based paints and a clear finish for safe, easy cleanup.
What basic tools and supplies do I need to get started?
A simple starter kit includes a small handsaw (or a craft knife for very thin shapes), sandpaper, wood glue, clamps, brushes, and non-toxic acrylic paints or markers.For families with kids, choose pre-cut shapes to skip cutting and reduce supervision needs. A kid-safe sealant or finish rounds out the kit.
How can we keep the projects safe and kid-friendly?
Pick non-toxic, water-based paints and finishes, and supervise any cutting or drilling. Sand edges smooth and round sharp corners before assembly. Use pre-cut shapes or blunt tools for younger children and keep hot glue out of little hands.
What are some beginner-friendly project ideas I can start with?
Try simple painted wooden eggs, bunny or chick shapes, or a decorative name plaque with easy letters. Cut, sand, paint, and assemble, then add a few embellishments like ribbons, buttons, or twine for a personal touch. Finish with a clear, child-safe sealant to protect the artwork.
Closing Remarks
these Easter wooden crafts show that good design comes from small, achievable steps. The takeaway is simple: with careful cuts,steady hands,and a splash of creativity,families can make keepsakes while sharpening essential woodworking skills. For enthusiasts, these projects offer a low-risk way to test finishes, fit, and problem-solving in a seasonal, meaningful context.Ready to begin? Choose a project, gather materials, and apply the planning tips you've learned. Or explore another guide to expand your toolkit. May your workshop glow with fresh ideas and sturdy, joyful keepsakes.


These DIY wooden Easter crafts look like such a fun way to get the whole family involved! Can’t wait to try some of these ideas together! 🐰🌷
What a wonderful way to celebrate Easter and create lasting memories! I’m excited to gather the kids and get crafty with these projects! 🐣💖
These projects are fantastic for sparking creativity! I love that they bring everyone together-can’t wait to see what we all create! 🐇🌼
These are such clever ideas! I love the thought of making personalized decorations that the kids can cherish for years to come. Can’t wait to dive into these projects! 🌸🥚
These ideas are absolutely amazing! I’m all for family bonding time and creating something special that we can use year after year. Excited to see our masterpieces in the making! 🐥🌈
These DIY crafts are such a beautiful way to engage the whole family in the Easter spirit! I’m thrilled about spending quality time with my loved ones while creating something meaningful together. Can’t wait to see what everyone comes up with! 🌟🥳
I love these projects! It’s great to have fun while being creative and making cherished decorations for Easter-can’t wait to start crafting with the family! 🐰🌷
I’m so inspired by these DIY wooden Easter crafts! It sounds like a wonderful way to bring the family together and make lasting memories while having fun. Can’t wait to get started and hear about everyone’s creative ideas! 🌿🐣
I’m so excited about these DIY wooden Easter crafts! It’s the perfect opportunity to let our creativity flow and create some beautiful decorations together. I can’t wait to see all the unique designs everyone comes up with! 🐇🌼
I’m so looking forward to these DIY wooden Easter crafts! They sound like such a fun way to bring the family together and make some special memories. I can’t wait to see everyone’s creativity shine through these projects! 🐣🌸
These DIY wooden Easter crafts are such a fantastic way to celebrate the holiday with family! I’m excited to share the joy of crafting and see all the amazing creations we can come up with together. Let’s make some unforgettable memories! 🌈🐤
These DIY wooden Easter crafts are such a delightful way to bond with the family while unleashing our creativity! I’m looking forward to crafting together and seeing all the wonderful ideas we come up with! 🐣✨
I’m thrilled about these DIY wooden Easter crafts! They offer such a unique opportunity for family bonding while getting creative together. I’m eager to dive into these projects and see the wonderful designs we all create! 🐣💖
These DIY wooden Easter crafts are an amazing way to spark creativity and joy within the family! I can’t wait to gather the supplies and see what fun designs we all come up with together-bringing everyone closer while celebrating this special holiday! 🐣🌷