
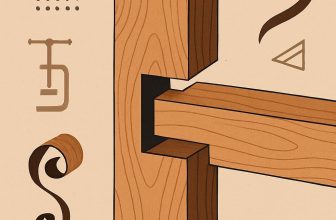
Strong joints don't shout-they quietly bear the load of our projects and the test of time. If your fits feel a touch imperfect or your techniques seem scattered,you're not alone. Joinery matters becuase sturdy connections are the backbone of a confident build, from tables that stay flat to cabinets that close with a whisper. This article cuts through guesswork with practical, beginner-pleasant tips that improve strength without slowing you down. In “Joinery Made Easy,” you'll learn how to choose joints for purpose, prep components for precision, test fit with care, and finish joints that wear well under use.
Alignment and fit for strong wood joints and reliable joinery
Alignment and fit are the invisible backbone of any strong wood joint. When pieces aren't square or edges aren't flush, glue and fasteners can't do their job, and joints creep under load. Start by verifying each workpiece is true: check squareness across the face and edge, confirm edges run straight, and ensure the mating surfaces meet flush along their entire length before you cut or assemble. A reliable routine uses a marking gauge, a straightedge, and a good square to lay out even, reference lines. Even small misalignment-1/64 inch or less-can multiply as the joint comes together, so addressing it early pays off later.
Plan your setup to lock alignment during assembly. Dry-fit the pieces without glue to confirm shoulders and end grains meet cleanly. Use clamps to hold pieces rigidly,and employ a drill guide or jig to keep mortises,tenons,or holes perpendicular to the surface. A little care with marking and cutting now saves costly rework later.
- Dry-fit first and inspect every shoulder for a snug, even gap
- Use a square and marking gauge to keep lines true across long workpieces
- Clamp from multiple angles and support the work to avoid bowing as glue dries
Different joints demand different alignment practices. The table below highlights quick tips that keep joints sitting true, along with a note on why it matters.
| Joint type | Key Alignment Tip | Common Issue |
|---|---|---|
| Mortise and Tenon | Parallels and shoulders flush; pin evenly seated | Open shoulders if mortise is oversized |
| Dowel Joint | Center holes accurately using dowel centers; keep pins tight | Misaligned holes cause skewed joins |
| Biscuit Joint | Slots aligned with a jig; biscuits seated flush | Slot misalignment creates gaps |
finish with a precise glue-up routine. Apply a thin,even film,re-check alignment before clamps draw the pieces together,and then clamp squarely to avoid twist.Wipe away excess glue promptly and let the assembly cure undisturbed. If a joint doesn't seat fully, don't force it-measure, trim, and adjust the stock or jig until it does. With a calm setup and deliberate checks, alignment and fit become the easiest part of building reliable, lasting joinery.
Build Your Dream Workshop on a Budget →
Choosing the right joinery method for lasting strength
Choosing a joinery method starts with tracing how the load path will travel through the piece and how the timber will move with changes in humidity. A strong joint resists pulling apart and staying flush over time, not just the first week after glue dries. Start from the grain direction, the project size, and the expected stresses, then pick a method that provides both mechanical fit and glue surface. Remember that wood movement is real-bulging, shrinking, and seasonal tweaks happen-so your joint needs to accommodate it rather than fight it. When in doubt, favor interlocking shapes or longer grain‑to‑grain contact that spreads stress more evenly.
Mortise‑and‑tenon joints remain the century‑tested backbone of structural work, especially in frames, doors, and stair components. When cut precisely, they offer outstanding shear and compressive strength with relatively little reliance on glue. For boxes, drawers, and cabinetry, dovetail joints provide a self‑locking interface that resists pull‑out and looks tidy on the inside and out. If speed matters or you're building lighter assemblies, pocket holes or dowels can deliver quick, repeatable results, but you'll trade some long‑term rigidity and visible repair options. Choose one that matches your skill level and the project's expectations for durability and appearance.
| Joint Type | Best For | Why It Works | Trade-Offs |
|---|---|---|---|
| Mortise and Tenon | Frames,rails,doors | Excellent strength with long-grain engagement | Requires accuracy and precise setup |
| Dovetail | Drawers,boxes | Interlocking glue surface; high resistance to pulling apart | Greater skill and time investment |
| Box / Finger Joint | Cases,carcasses | Strong,easy to automate; large glue area | Less customary appearance |
| Pocket Hole | Quick assemblies | Fast,forgiving for alignment | Not ideal for visible or high-stress joints |
To turn planning into durable joints,use a simple workflow: assess the load path,pick the primary joint that balances strength and ease of execution,mark accurately with a square and marking gauge,cut cleanly with sharp tools,dry‑fit to confirm alignment,then apply glue and clamp evenly before finishing. Practice on scrap pieces to confirm tolerance and technique before committing to the final piece.
Build Your Dream Workshop on a Budget →
Precision cutting and careful measuring for clean joints
Precision starts with intention and planning. Before any cut, map out the joint on the workpiece with a sharp marking knife or a fine pencil, and verify the layout with a straightedge and a combination square. A precise layout using a marking gauge helps create consistent lines along the grain, which reduces drift as you cut. A clear plan sets up clean joints and saves time during assembly.
Choose blades and setups that minimize tear-out and account for kerf. For crisp miters, a fine-tooth carbide blade or a dedicated miter blade yields the most accurate cuts. Always measure twice and verify both pieces fit together by dry-fitting before gluing. Use a backer board or zero-clearance insert to support the wood and prevent chipping at the exit.
Lock pieces in place with clamps or a bench vise, and align joints across both faces for a square outcome.When using a saw,check depth and angle and maintain consistent pressure. For long boards, use a stop block on a miter saw so your repeated cuts stay identical. After each cut, double-check the angle with a square and test-fit again, adjusting as needed.
To keep these tips practical at the bench, here's a quick reference for common joints and how to measure them. The table that follows highlights the essential checks to ensure tight,accurate joints.
| Joint | Key Measurement | Best Practice |
|---|---|---|
| Butt | Edge-to-edge alignment | Dry-fit, clamp firmly; ensure flat faces |
| Mitre | Angle (commonly 45°) | Verify with square; use stop block |
| Rabbet | Depth equals board thickness | Router/dado with depth stop |
Build Your Dream Workshop on a budget →
Clamping pressure and adhesive application for durable joints
Clamping pressure is the quiet workhorse of durable joints. It's not about squeezing glue into every crack, but about distributing force evenly so the two pieces marry cleanly along the entire joint. Begin with a dry-fit to verify alignment, then protect the faces with soft pads or scrap hardwood to prevent marring. Use cauls to spread load across wide surfaces and avoid creating pressure points at the corners. Remember: even pressure keeps glue lines slim and edges square, while over-tightening can squeeze out too much adhesive or bow the workpiece.
Choosing the right clamp setup matters as much as the glue you pick. The goal is steady, even clamping across the joint, not a single hard clamp that pinches the wood. Plan a layout that holds both faces true; for long stock, add cauls across the top to distribute pressure. Space clamps evenly, typically every 6-12 inches, and recheck alignment before the glue sets. A calm clamp plan reduces soap-lines and ensures a flush, accurate bond.
| Joint type | Clamp setup | Pressure goal |
|---|---|---|
| Butt or edge joint | 2-4 clamps across the piece; add cauls for long spans | Medium pressure to avoid squeeze-out |
| Butt with dowels or biscuits | Clamps at multiple points along the joint | Moderate pressure |
| Mortise and tenon | Cauls across faces; use bar/pipe clamps | Even, steady pressure |
| Mitered corners | Two opposing clamps plus supporting blocks | Light to medium pressure |
Adhesive selection and application: choose the right adhesive for the job and apply it in a uniform layer. For most interior work, a quality PVA wood glue works well; epoxy is your friend for end-grain or large gaps, and polyurethane adds gap-filling strength where moisture is a concern. Apply a thin bead along the joint and spread with a brush or a glue roller, then wipe away any squeeze-out promptly with a damp cloth. Fit the pieces and apply clamps with even pressure, rechecking alignment before the glue starts to set. Leave the assembly clamped for the recommended time until the adhesive achieves initial set, then keep it undisturbed during the full cure period. Work in a moderate environment, with stable temperature and humidity-avoid drafts and direct heat during curing.
Build Your Dream Workshop on a Budget →
Managing moisture and grain orientation to prevent joint failure
Moisture content isn't just a number-it's the invisible driver behind every wood joint. When moisture moves unevenly through stock, it can cause swelling, shrinkage, and stress that gnaws at glue lines. The way grain runs matters: aligned with the joint tends to stay steadier, while crossing the joint invites gaps, warping, or cracks. Start with well-seasoned stock and maintain a steady climate in your shop to minimize surprises, inspecting pieces for checks or cupping before glue-up.
Before you cut or glue, acclimate stock to the room's humidity. Use a reliable hygrometer to confirm MC, and aim for roughly 6-8% for interior pieces in a typical home climate (40-60% RH). Thick stock may hover a touch higher. Store pieces flat and elevated, away from heat sources, and avoid stacking so air can circulate. when gluing, strive to match the MC of mating parts within a 2-3 percentage point window; if the difference is larger, delay glue-up until both pieces settle.
Grain orientation isn't just about how it looks-it dictates how moisture moves across a joint and where stresses concentrate. End grain soaks up moisture faster and can act as a fast path for movement; avoid exposing end grain to high tensile loads in long glue lines.Favor joints that distribute glue across matching grain planes: mortise-and-tenon, dovetails, or finger joints, with faces and edges aligned to move together. For panels, leave a small expansion gap and allow floaters for seasonal movement. Finishing with a moisture-blocking seal helps reduce rapid exchange at exposed edges, but don't seal everything; wood still needs to move.
Putting these ideas into practice helps prevent surprise joint failure.Check your stock's MC with a meter and compare to your environment; acclimate for several days to weeks depending on thickness. During glue-up, clamp firmly but avoid forcing pieces that still differ in MC; if necessary, adjust your plan to allow movement. Design joints that carry loads across stable grain planes and allow for seasonal movement with gaps or floating panels. The table below offers a quick guide you can reference anytime you select stock or rethink a joint.
| Environment | Target MC | Action Tip |
|---|---|---|
| Interior/home (RH 40-60%) | 6-8% | Acclimate stock; glue-up at similar MC; clamp until cure |
| Workshop with seasonal swings | 7-10% | Store in a stable area; plan for some movement; joints tolerant of change |
| Outdoor/damp conditions | 9-12% | Seal joints, use weather-resistant design, allow larger expansion gaps |
Build Your Dream Workshop on a budget →
Finishing and maintenance tips to extend joint life
Finishing is the frontline defense for joints. Start by cleaning and drying all surfaces, then seal vulnerable end grains to slow moisture ingress.For interior projects,a penetrating oil or light wax can offer friendly versatility,while exterior or high-traffic pieces benefit from a tougher film like a polyurethane or spar varnish. In all cases, aim for a finish that moves with the wood rather than fights it, and keep humidity stable to minimize joint stress.
Apply finishes in thin, even coats, with light sanding between coats. Wipe away dust with a tack cloth before each layer, and let each coat cure fully before adding the next. Prioritize joints and end grain-the pinch points where boards meet-by brushing or wiping finish along the joint face to create a moisture barrier. If you expect exposure to moisture or sunlight, choose UV-stable products and recoat on a regular cycle to maintain the seal.
Maintenance on the bench or cabinet you built is as vital as the build. Clean surfaces regularly with a soft cloth and avoid abrasive cleaners that can scratch the finish. Inspect joints every season for hairline gaps or loosening fasteners; tighten screws gently and re-glue only where you see gaps that affect alignment. Reapply finish when sheen dulls or water no longer beads on the surface-the timeline varies with climate, usage, and finish type. For quick reference, see the table below.
| Finish Type | best Use | Why It Helps | Recoat Interval |
|---|---|---|---|
| Penetrating oil | Interior projects | Enhances feel, minimal buildup, flexible with wood | Every 1-3 years |
| Water-based polyurethane | Indoor furniture and cabinets | Durable film, easy cleanup, low odor | Every 2-4 years depending on wear |
| Spar varnish | Outdoor or damp environments | Elastic film that resists moisture cycling | Annual to biennial |
Build Your Dream workshop on a Budget →
Q&A
What is the simplest way to ensure a strong butt joint?
Start with a precise, dry fit so surfaces meet flush. Apply a thin, even layer of wood glue and clamp firmly until it sets. For extra security, add a fastener or a small reinforcement like a dowel or biscuit, but avoid relying on glue alone for load-bearing joints.
Which joints are best for beginner projects?
Dowel joints, simple box (finger) joints, or reinforced butt joints are ideal for learning and getting good results. dowel joints teach alignment and provide glue contact faces; box joints offer strong, square corners and plenty of gluing area. As you gain experience, you can tackle mortise-and-tenon for traditional strength.
How should I choose screws, nails, or other fasteners for strength?
Match fasteners to the joint and wood type, and always predrill to prevent splitting. Use screws or bolts for high shear strength and mechanical hold; nails can work for quick,lighter joints but are less resistant to pulling apart. Pair fasteners with glue or dowels to maximize rigidity.
What role do wood type and grain direction play in joint strength?
grain orientation determines how forces travel through the joint: glue holds best along the grain, while end-grain bonds can be weaker. Align mating pieces so the main forces run along the grain rather than across it, and avoid placing critical joints where tear-out is likely.Different woods also bite glue differently and may require conditioning or different adhesives.
Final Thoughts
Strong joinery doesn't require complexity-it starts with a clean fit, the right fastener or adhesive, and a patient clamp. The core takeaway is simple: respect the grain, test fit, and let the joint do the heavy lifting. When joints are solid, your pieces tell a longer story, aging gracefully with use rather than loosening over time. For woodworking enthusiasts, mastering these basics unlocks bigger projects and more reliable results. Try a new joint on a scrap project, skim another guide for a technique, and apply what you've learned to your next build. Build thoughtfully, and your workshop will feel more confident-and more alive.


This is such a helpful guide! I appreciate the clear tips; they’re perfect for both beginners and those looking to refine their skills in joinery. Can’t wait to try these techniques in my next project!
These tips are fantastic! I’ve always struggled with getting strong wood joints, but your advice makes it seem so much more manageable. Excited to put these methods to the test!
I’ve been wanting to improve my joinery skills for a while, and these tips are just what I needed! It’s great to see such practical advice laid out so clearly. Looking forward to applying these in my upcoming woodworking projects!
I’m so glad to see this post! Joinery can be intimidating, but your straightforward tips make it accessible for everyone. I’m eager to apply these techniques and finally achieve those strong joints I’ve been aiming for!
This post is a game changer for anyone working with wood! I’m thrilled to see such practical tips that simplify joinery; I’m definitely going to incorporate these strategies into my next builds. Thanks for sharing!
These tips are incredibly useful! I’ve always found joinery to be a bit daunting, but your clear and concise advice gives me the confidence to tackle stronger joints in my woodworking. Can’t wait to try them out!
This is exactly what I needed! Joinery has always felt overwhelming to me, but your straightforward tips really break it down. I’m excited to give these techniques a try and improve my woodworking skills!
These tips are fantastic! Joinery has always felt like a challenge, but your clear instructions really simplify the process. I’m ready to give these techniques a go and elevate my woodworking game!
These tips are a breath of fresh air for anyone struggling with joinery! It’s amazing how a few simple strategies can make such a huge difference. I’m looking forward to putting these into practice and seeing the results in my projects!
These tips are exactly what I needed to boost my confidence in joinery! It’s great to see complex techniques simplified and made accessible. I can’t wait to try them out in my next project and improve my skills!
These tips are just what I was looking for! Joinery can seem intimidating, but your straightforward approach makes it feel achievable. I’m excited to experiment with these methods and enhance the durability of my projects!
Thanks for sharing these insights! I always felt like joinery was one of the trickier aspects of woodworking, but your easy-to-follow tips are inspiring. I’m looking forward to applying these strategies in my next project and seeing how they enhance my craftsmanship!
These tips are incredibly helpful! Joinery has always seemed daunting to me, but your straightforward explanations make the techniques so much less intimidating. I’m eager to implement these methods and see how they transform my woodworking projects!
These tips are fantastic! I’ve always found joinery a bit tricky, but your clear explanations and practical advice give me the confidence to tackle it. I can’t wait to put these techniques into action and improve my woodworking skills!
I’m really grateful for these practical tips! Joinery always felt overwhelming, but your clear guidance has made it more approachable. I’m eager to experiment with these techniques and elevate my woodworking game!
These tips are a game changer! Joinery has always intimidated me, but your clear and simple advice makes it feel so much more feasible. I’m looking forward to trying out these techniques in my upcoming projects and improving my skills!
I’m so appreciative of these tips! Joinery has often puzzled me, but your clear and concise advice has made it much more manageable. I’m excited to dive into these techniques and see the difference it makes in my woodworking projects!
I’m really thankful for these tips! Joinery has always been a bit of a mystery for me, but your easy-to-follow advice is super encouraging. I’m excited to try these techniques out and see how they enhance my woodworking results!
These tips are incredibly helpful! I’ve struggled with joinery in the past, but your straightforward advice really breaks it down. I’m excited to apply these techniques and see how they elevate my woodworking projects!
These tips are fantastic! I’ve always found joinery to be quite challenging, but your clear advice makes it seem so much less daunting. I can’t wait to give these techniques a try in my next project and see the improvements!