Turn a single block of wood into a memory that lasts.For woodworking enthusiasts, handmade gifts are more than gifts-they're demonstrations of skill, patience, and personal touch that mass-made items can't match. This topic matters because it blends creativity with practicality, breathes new life into scraps, and strengthens a maker's repertoire.in this article you'll discover unique gift ideas you can craft yourself,plus practical tips on selecting wood,planning projects,and achieving durable finishes. By the end, you'll feel ready to design, tailor, and complete thoughtful keepsakes that gift-givers and receivers will treasure.
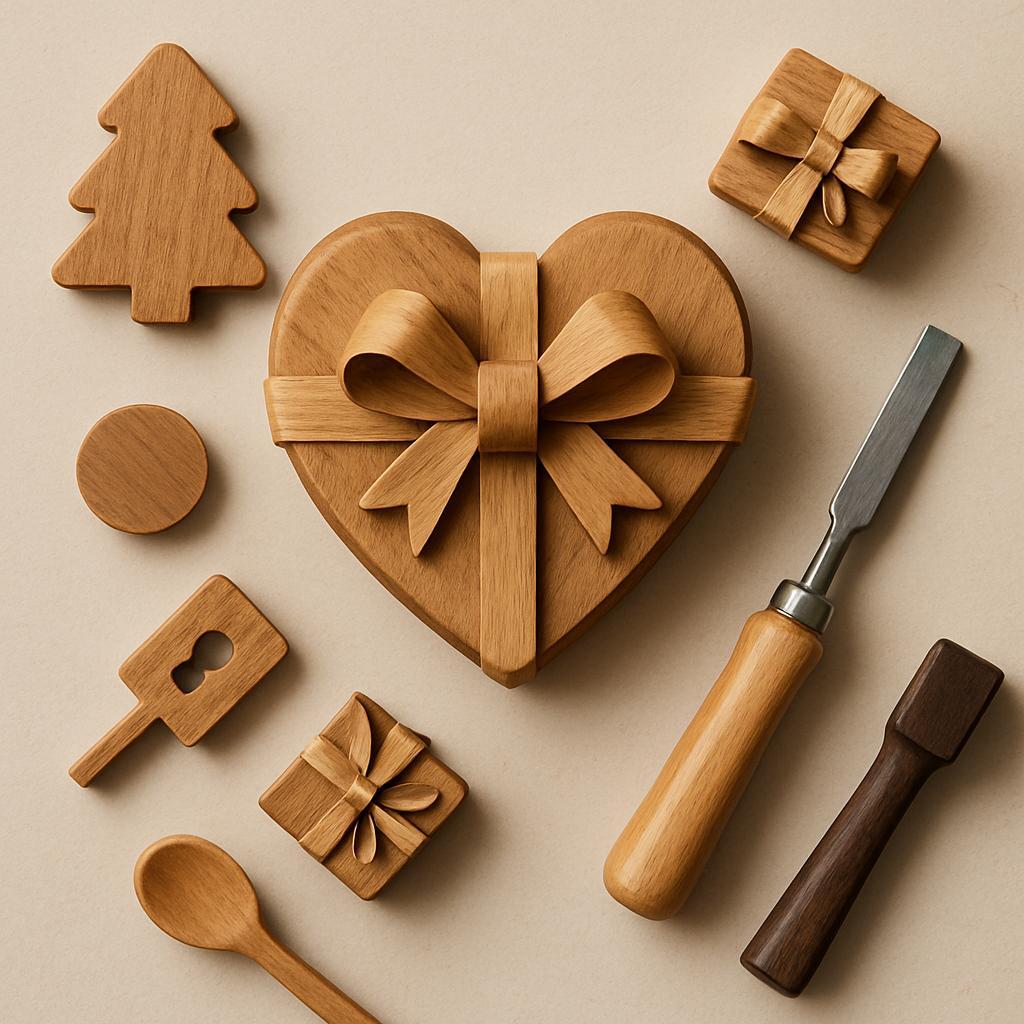
Unique Wooden Gift Ideas You Can Craft Yourself
Handcrafted wooden gifts carry a personal story. By repurposing scraps or selecting a favorite wood species, you can create practical keepsakes that age beautifully with the recipient. Think about what they love-maps, initials, or a favorite quote-and translate that into grain, texture, and finish.
- Engraved keepsake box with a softly beveled lid for jewelry or mementos.
- Coaster set with initials or a nature motif for a stylish desk or coffee table.
- Personalized spoon rest with a carved motif or burned design for the kitchen.
- Mini wall plaque with a name or phrase for a radiant, thoughtful home accent.
To bring these ideas to life, plan your workflow step by step. Start with choosing the wood-maple for a light, clean look or walnut for contrast-and decide on a finish that suits the gift (beeswax for a natural satin, or a water-based varnish for durability). Create simple templates, cut to size, then sand through grits 180-220 for a smooth surface. Glue joints if needed, assemble carefully, and finish with a wipe-on coat.Practice on scrap before committing to the final piece.
| Idea | Materials | Approx. Time | Skill |
|---|---|---|---|
| Engraved keepsake box | Hardwood or plywood, engraving tool | 2-4 hrs | Beginner-Intermediate |
| Coaster set | Hardwood blocks, sandpaper, finish | 1-2 hrs | Beginner |
| Personalized spoon rest | Hardwood plank, carving tool or laser/engraver | 1-2 hrs | Beginner |
| mini wall plaque | Wood board, paint/stain, hanging hardware | 2-3 hrs | Beginner-Intermediate |
Finishing touches can elevate the gift beyond its function. Choose a durable yet tactile finish, like mineral oil with beeswax or a matte polyurethane, and test it on scrap to ensure color and sheen. Package the item with care-soft wrap,a handwritten care note,and a small polishing cloth-and consider pairing the gift with a matching display or storage solution so the recipient can enjoy it for years.
Build Your Dream Workshop on a Budget →
Choosing The Right Wood And Finishes For Durable Personal Gifts
Choosing the right wood starts with durability and stability. For keepsake gifts that endure daily handling, opt for hardwoods such as maple, walnut, cherry, or oak, which resist dents and wear better than softwoods. Make sure the boards are well-seasoned or kiln-dried to reduce warping, and look for tight grain with minimal warp risk. If your project includes fine edges or carved details, a straight, stable grain helps you get clean joints and a smooth surface for finishing.
Finishes act as armor for your wood. For gifts that will be touched often, choose durable finishes like oil-and-wax blends, polyurethane, or UV-cured coatings.If the piece may contact food or skin, pick food-safe or low-VOC options and test on a scrap first. Wipe-on finishes tend to bring out warm grain, while spray or wipe-on poly provide tougher protection. Allow ample cure time between coats and sand lightly between steps to keep surfaces flat and durable.
use this quick reference to guide your choices for common gift ideas:
| Project Type | Recommended Wood | Finish | Notes |
|---|---|---|---|
| Coasters | Maple or Walnut | Oil or Water-based Poly | Durable; easy to clean |
| Keepsake Box | Cherry or Walnut | Oil-based Finish + Wax | Rich color; secure joints |
| Cutting Board | Maple | food-safe Oil (Beeswax blend) | Durable and food-safe |
| Decorative Item | Oak or Ash | Shellac or Satin Poly | Subtle sheen; low maintenance |
Maintenance and care keep gifts looking great for years.Consider these simple habits to maximize durability:
- Store items in a stable humidity habitat to prevent warping
- Dust with a soft,dry cloth and avoid abrasive cleaners
- Reapply finishes every few years or when the sheen dulls; lightly sand between coats
- Protect from prolonged water exposure and direct sunlight
Build Your Dream Workshop on a Budget →
Easy DIY Wooden Gift projects For Beginners
Easy, beginner-friendly wooden gift projects start with simple shapes, forgiving woods, and a clear plan.Gather a small toolkit: a handsaw or mitre box, 120-220 grit sandpaper, wood glue, clamps, a ruler, and a light finish such as mineral oil or polyurethane. Sketch each piece first and cut to size in batches to keep mistakes down. A well-prepped surface and accurate joints make even plain pieces look polished.
Here are four beginner-friendly projects you can complete in an afternoon:
- Coasters: cut four 4×4-inch squares from hardwood or pine, round the corners with a sanding block, sand edges smooth, and apply a protective finish (oil or wax). Personalize with initials using a wood-burning tool or a subtle engraving for a special touch.
- Photo Frame: cut four pieces for a simple frame, join with 45-degree miters, glue and clamp, add a backing and a photo slot, then finish with oil or stain to highlight the wood grain.
- Key Rack: rip a small wall-mounted block (about 6x2x1 inch), drill two to four evenly spaced holes for hooks or install metal hooks, sand, finish, and mount with screws on a wall or inside a closet door.
- Desktop Tray: assemble a shallow tray from a base and two side walls using glue and a few nails, sand smooth, apply a protective finish, and optionally add a divider to keep loose items organized.
| Project | Materials | Estimated Time |
|---|---|---|
| Coasters | Wood squares, sandpaper, finish | 30-45 min |
| Photo Frame | Wood strips, glue, backing | 60-90 min |
| Key Rack | Wood block, hooks, screws | 40-60 min |
| Desktop Tray | Wood plank, glue, nails | 60-90 min |
Finish and personalize each piece to elevate the gift. Choose finishes that suit the project: mineral oil or beeswax for a natural look on coasters, water-based poly for a frame, or a soft stain with a clear topcoat for the tray. Add initials, a date, or a small design using a wood-burning tool, decals, or hand-painting. pack the finished gift with simple wrap and a care card outlining how to clean and maintain the wood.For best results, practice cuts on scrap wood first and keep a few blank pieces ready to go for spontaneous gifting sessions.
Build Your Dream Workshop on a Budget →
personalization Techniques For Wooden Gifts Engravings And Inlays
Personalizing wooden gifts with engravings and inlays blends technique with story.Laser engraving offers precision for crisp text and fine lines, while hand-carved details add warmth and character.Start by choosing a wood with a clear, attractive grain and a color that contrasts with your design; common favorites include maple, walnut, cherry, and oak. Think about the recipient's story-names, dates, or a short quote can become a banner within the surface, making the piece feel truly one-of-a-kind.
| font style | mood | Best Use |
|---|---|---|
| Modern Sans-Serif | clean,contemporary | Monograms,gift tags |
| Script / Cursive | Elegant,personal | keepsakes,wedding gifts |
| Classic Serif | Timeless,readable | Quotes,dates |
When planning an engraving,prioritize readability and harmony with the piece's shape. Choose fonts that fit the area: bold sans for prominent statements on larger surfaces, delicate script for keepsakes, or a timeless serif for heirloom items. Create a clean layout with generous margins and consistent letter spacing; test on scrap wood at the same depth you'll use on the final piece. For depth and contrast, consider multiple passes or a shallow initial pass followed by a deeper engagement on sections you want to pop. If you want to highlight against dark woods, a light fill after engraving can dramatically improve legibility.
Inlays open a new dimension of personalization by introducing contrasting woods or materials. Plan the motif on graph paper or in a digital mock-up, then translate it to grain-matched pieces that fit snugly into the surface.Choose inlay woods that share similar expansion characteristics and color relationships (for example, maple with walnut for high contrast, or cherry with bloodwood for a warmer glow). Use a snug template and a sharp router or chisel, then secure with wood glue and a light clamping to ensure a seamless flush surface. After drying, lightly sand the edges to keep the transition invisible and the lettering crisp.
| Inlay Wood | Look | Care |
|---|---|---|
| Maple | Light, high contrast | Wipe, avoid moisture |
| Walnut | Dark, rich | Seal to reduce oils |
| Cherry | Warm, subtle | Maintain with wax |
Finish and presentation seal the personalization. Apply a protective coat that preserves the engraving or inlay without dulling it-a thin oil like tung or a matte varnish frequently enough works well on woods with open pores. Sand between coats with fine grit to keep the surface silky, then top up with a final polish. For gifting,consider a simple presentation: label the item with its story or date,wrap in kraft paper,and include care notes so the recipient can enjoy the craft for years. A quick test on a scrap piece can save you from surprises on the actual gift.
Build Your Dream Workshop on a Budget →
Essential Tools Safety And Workflow Tips For Crafting Wooden Gifts
Set aside a dedicated, well-lit workspace with clean surfaces, good ventilation, and a clear plan for each gift project. Before you touch wood, equip yourself with eye protection, ear protection, and a dust mask. Dress for safety: snug clothing,hair tied back,and no loose jewelry. Create a cut list and sketch the dimensions before you start; this reduces mistakes and waste. Keep clamps, rulers, and squares within arm's reach and use a stable bench or vise to hold work, never balance pieces on your knee while cutting. When using power tools, engage guards, unplug to swap blades, and always cut away from your body.
Below is a compact reference you can pull up while you work.
| Tool | Common Gift Task | Safety Tip |
|---|---|---|
| Utility knife | Trim edges, score veneer | Keep blade sharp; cut away from you |
| Measuring tools (tape, ruler, calipers) | Accurate dimensions | Double-check marks and use a square |
| Handsaw / backsaw | Fine crosscuts and joinery | Secure work; keep blade straight |
| Drill/driver & bits | Pilot holes, joinery drilling | Clamp securely; use the right bit; avoid kickback |
| Random orbital sander | Smoothing surfaces | Use dust collection; move evenly to avoid gouges |
With safety in mind, approach each gift in clear steps: start with a precise plan and cut list; mark your parts with a square and gauge, then cut pieces slightly oversized and trim to final size; drill any holes before assembly and then shape edges with files or sandpaper; sand progressively from 120/150 up to 220-320 grit for a smooth surface; dry-fit components before applying glue, and clamp firmly untill the joints set while checking alignment; finish with thin, even coats and light sanding between coats for a professional look.
Finish choices should suit the gift's use: a kitchen item benefits from a food-safe finish, while keepsakes can glow with oil, wax, or varnish. Work in a well-ventilated area and wear a mask when sanding or applying finishes. Clean your tools after use, empty the dust collector regularly, and keep blades sharp so cuts stay clean and safe. Establish a simple maintenance routine: sharpen edges with the right jig, replace worn bits, and store tools in a dry, organized setup so your next project starts with confidence rather than chaos.
Build Your Dream Workshop on a Budget →
Finishing Touches That Elevate Your Handmade Wooden Gifts
Little finishing touches turn a handmade wooden gift into something with personality and lasting charm. start with a smooth,well-sanded surface and gently rounded edges to invite a touch. A hand-rubbed oil or a soft beeswax finish can coax depth from the grain and add a tactile warmth that the recipient can feel. For a personal touch, consider a tiny, laser-engraved initial or a carved motif on a discreet corner-details that speak to the recipient without overpowering the piece. Even the choice of packaging can reflect care,echoing the finish with a complementary ribbon or tag that names the occasion.
When you apply the finish, keep the process intentional and light.Work in a well-ventilated space, and apply thin coats rather than a single heavy layer. Wipe away any excess after a brief interval to prevent sticky spots, then let each coat dry wholly before the next. Between coats, sand with a very fine grit (320-400) to maintain a silky surface. For a natural glow, start with a penetrating oil such as tung or Danish oil, then optionally follow with a soft wax to boost sheen and protection. If you need greater durability, test a clear varnish or polyurethane on scrap wood first to confirm it won't obscure the grain.
To help you decide at a glance, here's a concise comparison of common finishes and what they bring to a gift piece:
| Finish type | Pros | Best for | Typical dry time |
|---|---|---|---|
| Oil (tung / Danish) | Deep, warm glow; easy touch-up | Food-safe surfaces; decorative items | 24-48 hours per coat |
| Beeswax polish | Soft sheen; low odor; easy re-request | Keepsakes; heirloom gifts | 1-2 hours + buff |
| Clear varnish / polyurethane | Durable; protective layer | Kitchenware; functional pieces | 24-72 hours |
polish the presentation as part of the gift itself. Include a small care card with simple instructions, such as storage away from direct sun and heat, and occasional re-waxing every few months for heirloom pieces. wrap with craft paper or fabric that echoes the wood tone, tie with natural twine, and add a hand-stamped tag or a tiny wooden charm. A thoughtful combination of finish, engraving, and packaging creates a gift that feels custom-made for the recipient and ready to be treasured.
Build Your Dream Workshop on a Budget →
Q&A
What are some beginner-friendly wooden gift ideas I can make in a weekend?
start with small, functional items that don't require complex joints.Think cutting boards, coasters, napkin rings, or a simple picture frame. With light sanding and a few coats of finish, these gifts come out polished and ready to give.
How can I personalize wooden gifts to make them meaningful?
Add initials or a short message, pick colors that suit the recipient, or incorporate a hobby motif. If you have access to engraving tools or hand-painting skills, you can carve names, dates, or symbols for a lasting touch. Small personalization goes a long way without complicating the project.
What tools and materials do I need to start crafting wooden gifts at home?
A basic toolkit is enough: a saw, drill, clamps, sandpaper, wood glue, and a finish. Start with softwoods like pine for easier work and practice on scrap first.Don't forget safety gear and a few scrap pieces to test your technique.
How do I finish and seal wooden gifts to make them last?
Sand surfaces smooth with fine-grit paper, then wipe away the dust. For kitchen items, use food-safe finishes like mineral oil or beeswax; for decor, a durable polyurethane or varnish works well.Allow proper cure time between coats and wipe off any excess to avoid sticky spots.
Wrapping Up
These ideas remind us that the best gifts are crafted, not copied: a few careful cuts, a patient finish, and a story that travels with the item. The key takeaway: you don't need complexity to create meaning-personalized, well-made pieces can be memorable with thoughtful design and quality materials. For woodworking enthusiasts, this matters because every project hones technique, sparks creativity, and connects maker to recipient in a tangible way. Take action: pick one idea, sketch a plan, assemble the right wood and finish, and share the result. Explore more guides, adapt lessons, and let your craft grow. Your next gift waits-and so do your skills.


What a fantastic idea! I love the thought of giving personalized wooden gifts; they always feel so special and meaningful!
These are such creative suggestions! Handmade wooden gifts add a personal touch that store-bought items just can’t compete with.
These wooden gift ideas are incredible! I can’t wait to try my hand at crafting some of these unique pieces for my friends and family.
These wooden gifts are absolutely wonderful! I’m excited to start crafting my own versions-nothing beats the charm of a truly handmade present!
I love these ideas! There’s something so special about creating a gift from scratch, especially when it’s made of wood. Can’t wait to get started on my own projects!
I’m so inspired by these unique wooden gift ideas! There’s a certain warmth and character in handmade gifts that really shows how much you care. Can’t wait to unleash my creativity!
I’m so excited to see so many people embracing the art of crafting handmade wooden gifts! It’s such a great way to put your personal touch on a present, and I love the idea of creating lasting memories through these projects.
I love how versatile wooden gifts can be! Each piece tells a story and carries a unique charm that store-bought gifts just can’t match. Looking forward to getting creative!
These wooden gift ideas are fantastic! It’s amazing how crafting something personal can make a gift even more meaningful. I can’t wait to try my hand at some of these projects!
These wooden gifts are such a meaningful way to show appreciation and love! Crafting something by hand not only makes it special but also allows for countless personalized options. I’m eager to dive into these projects and see what I can create!
I absolutely love the concept of handmade wooden gifts! They carry a personal touch that can’t be replicated, and crafting them not only taps into our creativity but also allows us to connect with our loved ones in a heartfelt way. Excited to explore these ideas!
Absolutely! There’s something magical about transforming raw wood into a heartfelt gift. The creativity involved and the satisfaction of making something unique makes the effort worthwhile. Can’t wait to get started on my own projects!